
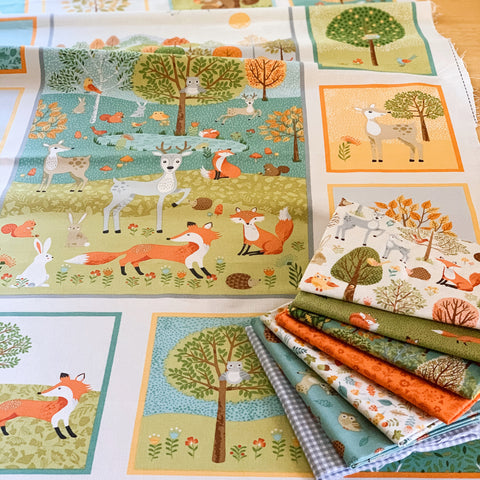
Forest collection is full of adorable animals and fun patterns. The warm color palette makes for perfect fall (or any season, really) projects!
Forest Scene Panel is great for baby/kids quilts. The size in this tutorial is more on the 'baby' side, but add another border or two and it would be great for a child of any age.

There is a throw pillow pattern at the end here to use up all the cute panel blocks and leftovers from the fat quarters.
These fabrics are so fun to work with. Just look at those hedgehogs! And foxes! and owls! I could go on... let's get started.

MATERIALS
To make this baby quilt and throw pillow, you will need:
***The Forest collection is sold out and cannot be reordered***
- 1 Forest Panel
- 1 Forest Fat Quarter Bundle
- 1/2 yard of Forest - Gingham in Gray for first border and binding
- 1/2 yard of Forest - Animal Scatter in Teal for outer border (18" exactly are needed here. If you like to have extra for errors, order 1 yard).
- 1 1/2 yards of Forest Scene in Cream for backing
- Aurifil 50wt cotton thread in Light Sand
- Batting at least 45" x 54"
- 18" pillow form
- 1/2 yards of Bella Solid in White or Snow for pillow
You will also need:
- A rotary cutter
- A rotary cutting ruler
- Cutting Mat
- Fabric scissors
- Pins or clips
- Marking tool
PATTERN
Finished quilt size is 35 1/2" x 46". Finished throw pillow is 17 1/2" x 17 1/2". All seam allowances are 1/4" unless otherwise noted.
CUT
From the panel, cut each rectangle along outside of colored trim (keep the tree strips for the throw pillow).

Patchwork rows: from the fat quarters Trees and Leaf Ditsy, cut (2) 3" x 13 1/4" strips. From the fat quarters Foxes and Doodle Ditsy Orange, cut (1) 3" x 13 1/4" strip.

Half Rectangle Triangles: from Forest Scene fat quarter, cut (5) 5 1/4" x 6 1/2" rectangles.
From five remaining fat quarters (except the gingham), cut (1) 5 1/4" x 6 1/2" rectangle.

First border: from the gingham yardage, cut (2) 2" x width of fabric strips. Subcut each strip into (1) 14" strip and (1) 25" strip.

Outer Border: from Animal Scatter yardage, cut (4) 4 1/2" x width of fabric strips.

Binding: from the remaining gingham yardage, cut (5) 2 1/2" strips.
SEW
Starting with the large center panel: place a 2" x 25" gingham strip right side down on each side of the panel. Line up raw edges, pin and stitch. Press seam towards border.
Repeat with the 2" x 14" gingham strips, attaching to top and bottom of panel.


Making the half rectangle triangle blocks:
Cut each of the 5 1/4" x 6 1/2" rectangles in half on the diagonal, from bottom left to top right. Make sure the directional fabrics are oriented the correct way.

I made three stacks and cut multiple layers at a time to save a bit of work.

Match up one Forest Scene HRT with one of the other prints. You will have one Forest Scene triangle on top and one Forest Scene triangle on bottom for each of the other five prints.

Piecing the HRTs together: Starting with one set, right sides together, line up diagonal edges overlapping 1/4" at points.


Repeat for 10 HRT blocks.

Trim off dog ears.

Piecing the panel borders:
Alternating between a HRT and a small panel block, make two vertical rows to go on the sides of the large center panel. For the left side, use the HRTs with Forest Scene on the bottom. Order will be HRT, panel, HRT, panel, HRT. Repeat order for right side, but use the HRTs with Forest Scene on the top. Press seams toward panel block.
Now make two horizontal rows for the top and bottom border. For the top row, use HRTs with Forest Scene on top. Order will be panel, HRT, panel, HRT, panel. Repeat order for bottom row, but use the HRTs with Forest Scene on bottom. Press seams toward panel block.
Attach border rows to large center panel, starting with the sides and then top and bottom. Press seams as you go.


This is what it looks like so far:

Now for the patchwork rows. Stitch together three of the 3" x 13 1/4" strips along the short ends. Repeat with remaining strips. For the left side, order is Leaf Ditsy, Foxes, Trees. For the right side, order is Trees, Doodle Ditsy, Leaf Ditsy. Press seams.

Attach rows to left and right sides of the quilt top.

Outer border: Line up raw edges of outer border strips on left and right sides of quilt top. Pin and stitch.
Trim off excess fabric. Press seams towards outer border.

Repeat for top and bottom.

Quilt and bind as desired.

Enjoy!


For the throw pillow: Add sashing in between the 6 leftover panel blocks.
From the remaining Gingham fat quarter, cut (4) 1 1/2" x 6" strips, (3) 1 1/2" x 15 1/2" strips and (2) 1 1/2" x 14" strips.
Sew the 6" strips to the right side of 4 panel blocks. Press seams.

Sew the 15 1/2" strips to the top and bottom of the first row, and one to the bottom of the second row. Press seams.
Sew rows together. Press seams.
Sew the 14" strips to the sides. Press seams.
Trim up the strips of trees from the original panel. Trim to 2 1/4" x 17 1/2". Sew one strip to the top of pillow front and one to the bottom. Press seams.
Add a layer of 17 1/2" x 17 1/2" batting and solid fabric to make a quilt sandwich. Quilt as desired.
For the pillow back, piece together fat quarter leftovers to make (2) 17 1/2" x 11" pieces. Add a layer of 17 1/2" x 10" batting and solid fabric to make a quilt sandwich (batting and solid fabric will be one inch shorter). Quilt if desired.
Now, fold the top edge of the backing down to meet the edge of the fusible fleece. Press in place. Fold the top edge of the backing down again, this time it will come 1/2" over the edge of the fleece. Press. Top stitch in place, 1/4" from the edge.
Place pillow front right side up on the table. Align raw edges of one backing piece, right side down, with the top and sides of the pillow front. The finished edge of the backing will be in the center(ish) of the pillow front.
Now align the second backing piece, right side down, with the bottom and sides of the pillow front. Backing pieces should overlap in the center of the pillow front.
Clip in place. Stitch around entire pillow.
Turn pillow right side out through the envelope opening that the back makes. Smooth around edges with your hands, making sure front and back are lined up nicely.
Stuff pillow form into pillow cover and enjoy!
(For detailed photos to go along with basic assembly instructions for throw pillow, see Bordered Diamond Pillow tutorial).

This quilt and pillow look so cute together!


Even pups love this set :)


Thank you for reading along. Please let me know if you have any questions!
Can I buy this fabric kit with the pattern somewhere?
love the forest baby quilt. looking for the coordinating forest fat quarter bundle to go with the panel but don’t see it listed.
thank you
What do you mean overlap by 1/4 inch on the HRT blocks? It looks like they are lined up in the picture?