Desert Diamonds Quilt

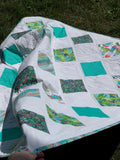
I had this vision for this pattern for a while, but couldn't decide which fabrics to use. Once I saw Desert Blooms by Maude Asbury, I knew it would be perfect! The diamond shape and size really shows of the beauty of these fabrics.

This quilt top goes together quickly, and its easily customizable. Want it a little larger? Add more diamonds. Want it framed? Add a large outer border!

Desert Blooms collection is so fun to work with. I hope you enjoy making this quilt as much as I did.

MATERIALS

    To make this quilt, you will need: You will also need:
    • A rotary cutter
    • A rotary cutting ruler
    • Cutting Mat
    • Fabric scissors
    • Fabric marking pen
    • Pins or clips
    • Fabric glue stick

    PATTERN

    The finished quilt size is 53" x 63”. There are 30 blocks total with a 5 x 6 layout.

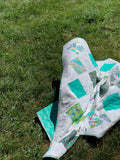
    I did the binding a bit different for this quilt. Since I decided to just do a small white border, I wanted the binding a little bigger to better frame the quilt. So, I cut the binding wide, and I used a wider seam allowance to sew it on. I love how it came out!

    CUT

    From each fat quarter, cut 6 ‘diamonds’. These are just 6” squares, but make sure they are cut so the direction of the fabric is vertical.

    I used a 6” square ruler and marked each diamond so that I could make sure the patterns looked good.

    From the background fabric, cut 8 strips 10 1/2” wide. Sub-cut each strip into (4) 10 1/2” squares. You will have 30 squares total.

    From the remaining background fabric, cut 6 strips 2” wide for the border.

    From the binding fabric, cut 7 strips at 3 1/2” wide.

    SEW

    Find the center of a background square by folding and creasing it in half vertically, and horizontally.

    Line up all four corners of a diamond piece with the crease marks. Glue or pin in place.

    I prefer to glue in place. I find it much easier to stitch down when it’s glued, rather than just pinned. But because these diamonds have bias edges, be careful not to stretch them out while applying the glue. I like to place my hand in the middle of the diamond to stabilize it, then go around the edges with the glue stick.

    Repeat this process for all 30 squares.

    Appliqué stitch the diamonds in place. I used three different teal/green shades, just to add a little more fun.


    You should now have 30 appliquéd diamond blocks. Now, lay out all the blocks, with 5 blocks across and 6 blocks down.

    I tried a couple different layouts here. I thought I would like a more organized look, but when I tried it, I actually decided I liked the mixed up look better for these fabrics. Try a few out for yourself to see what you like best. If you have a dog, consult with them.

    Once you have a layout that you like, snap a photo to look back on after you start piecing.

    With right sides together, pin and sew the squares into rows using a 1/4 inch seam allowance. Press seams, alternating the direction you press from row to row.

    The top row is pressed to the left, second row is pressed to the right, third row is pressed to the left, fourth row is pressed to the right, and so on. By pressing this way, we will be able to get a flat 'locked' seam when the rows are sewn together.


    It may be helpful to refer back to the photo you snapped as you are sewing the squares and rows together, to make sure its coming together how you wanted.

    With right sides together, align bottom of row one with top of row two. Pin rows together, making sure the seams in each row are aligned and ‘locked’. Press seams open. Repeat until all rows are sewn together.

    Now for the small border - Cut two of the strips in half.

    Cut off all selvedge edges on each strip. Attach one half strip to each full strip. With right sides together, place the half strip on top of the full strip at 90 degree angle, with edges lined up. Draw a 45 degree line from top corner of the half strip to the bottom corner of the full strip. Stitch along this line to sew strips together. Trim seam allowance to 1/4" and press open.

    You should now have 4 strips that measure 2" x 60(ish)".

    With the quilt top facing up and the border strip facing down (right sides together), line up long edges along each side of the quilt and stitch in place. Press seams toward border strips. Repeat for top and bottom of quilt.

    The quilt top is complete!

    Quilt as desired.

    I just did very simple diagonal lines in between the diamonds. I then added a few stitched diamonds sprinkled here and there for a little more depth.

    Bind as you normally would, but instead of using a 1/4” seam allowance, use a 1/2” seam allowance. This will make the binding wider on the front of the quilt, giving it more of a frame that I talked about earlier.

    That’s it! Enjoy your Desert Diamonds :)

    This was my attempt at a "blowing around in the wind" action shot...it didn't exactly go as planned!

    :)

    Please let me know if you have any questions. Thank you for following along with me. 


    Older Post Newer Post